
ASP.Net is truly a wonderland, full of magic for you to explore. Its built-in frameworks offer convenience that can make you feel like a wizard wielding the wand to create an application. One of the magic that you have to try is the login system.
Why a login system
Almost all of the dynamic, data-driven applications and websites today require you to create an account, log in to use the unique service they offer. And it is not without a good cause. Logging in to a site creates your own personal space within that site. And from that, we, developers can tailor the unique experience just for you in that space.
For example, in the hospital project, I am working on, if you log in you can get access to all kind of services in the hospital like sending a get well soon card, registering a parking spot, booking an online appointment or even putting your name in the hospital’s events etc…
With that being said, without further adue, here is how it is implemented…
Step 1: Say the spell
For all magic to happen, you have to say the right spell (don’t say Avada Kedvra please). For .Net, the login system I built is based on Entity Framework 6 (EF6) using together with the Model View Controller (MVC5), .Net Framework. Remembering these keywords also helps you a lot in researching whenever you come into bugs (trust me, you will).
To start this, when creating a new project, in the Create a new ASP.NET application, click on MVC click Change under No Authentication and choose Individual User Account.
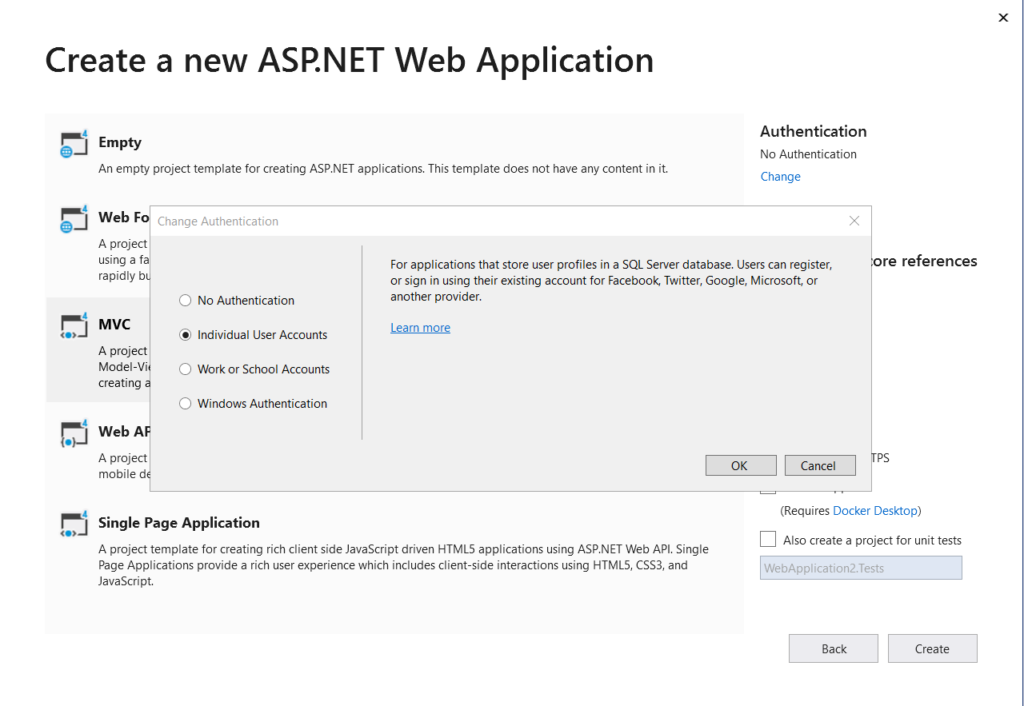
And voila. Now you can see all the built in function that ASP.NET layout for you in order to build a great app.
Step 2: Reverse Engineering
When you finish Step 1, you probably notice that .Net framework has created a basic code base for us. You can find a whole bunch of files under all three folders: Controllers, Model and View.
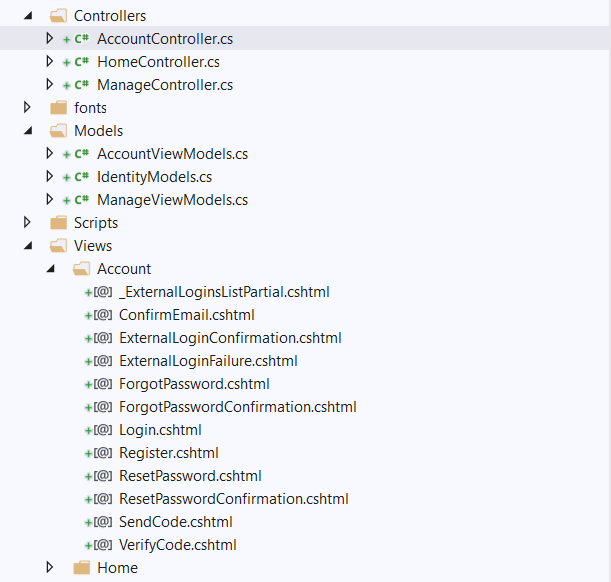
And this is the part I like most: Reverse Engineering. Others may argue but I feel like I understand better when someone throws at me a tonne of codes and ask me how it is used rather than learning line by line. By a little bit of reverse engineering, with that code-base, you can see that .NET have already laid out the most basic stuff for you. Users can now register then log in with the registration information they provide. Just take a look at that, do some experiments with it. You don’t need to understand it right away but trust me, later on, you will have the “aha” moment.
Step 3: Analyzing the problem
As mentioned above, my login system will divide the access right for different users in the site. There are two ways to do that, one depends on who you are, the other depends on what is your role in the website. For example, for a hospital website, you can divide the user into patients and families, donors, applicants, doctors, nurses, editors and admin etc… Each group will have its unique content and restricted area. A patient cannot access the doctor’s file and another patient’s information for instance.
The other method is what is your role. In this method, what you do with the website is more important than who you are. Based on that, patients and families, applicants and donors can be categorized into the same group as they are after all website users. Editors will be grouped together and an admin who is a super-user can be in a group of his own.
As you can see, the role-based system is actually simpler and that’s why I prefer it over the other but depends on the context of your website, you can use whatever method that suits you.
Step 4: Slicing down the problem
If you watch my blog, you will see that I have the habit to divide a big problem into many smaller ones. And for this one, this is the step I have laid out:
- Create the basic register, login form: .Net has already done that for us
- Choose between role-based or person-based system: done that already
- Identify how many and create roles your website should have: normally I usually divide into 3 roles: registered user, editors and admins. You can have more depends on the complexity of your website
- Restrict and allow access based on the role that people have on the web site: An admin should have access to create, read, delete and update every entry. An editor can create, update, read but he should ask permission from the admin to delete. A registered user only has the right over his/her own content.
Slicing down the problem like that also helps you a lot in research and later on in the debugging process. If you have not known that, revisit my Programmer’s Cat theory.
Step 5: Registering the role
Now is the time you put the knowledge you gain from the Reverse Engineering above into good use. If you study the boiler-plates that .Net set up nicely for us, you can see that the login system is actually Model-View-Control at its core. That is why it has Account Controllers, Account View Model and Account View. So what if we could do the same with the Roles? The admin can create, assign people to roles, add more roles and delete the roles as he needed. So basically it is the MVC system. So because of that similarity,
And now the code:
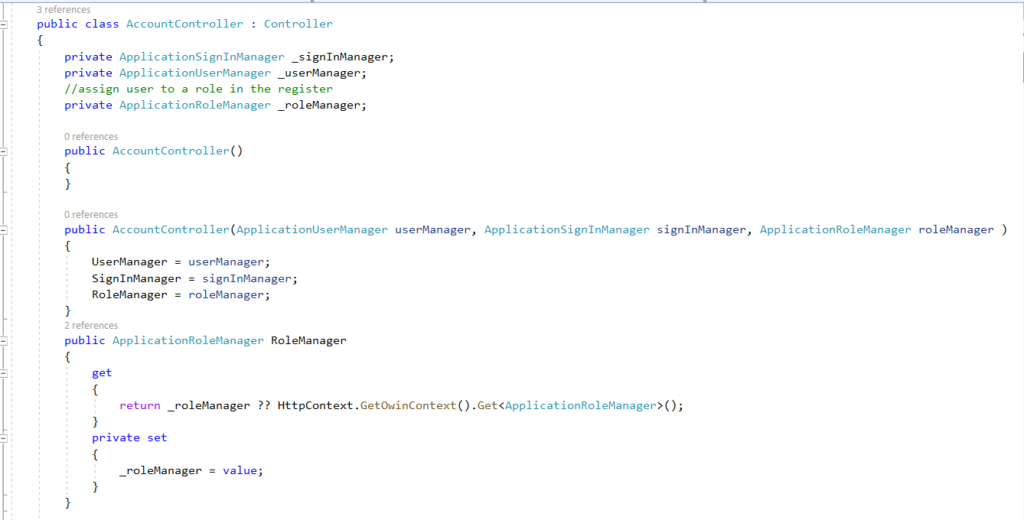
Adding the RoleManger in the Account Controller’s part. Here the Signin Manager and user Manager is already built-in. Sign in Manager will register your sign in information to create your profile. User Manager will check that information whenever to determine whether you are truly who you claim to be. Base on that, I introduced another player in the game. The role Manager, so that .Net will know what role you have on the website in order to proceed further.
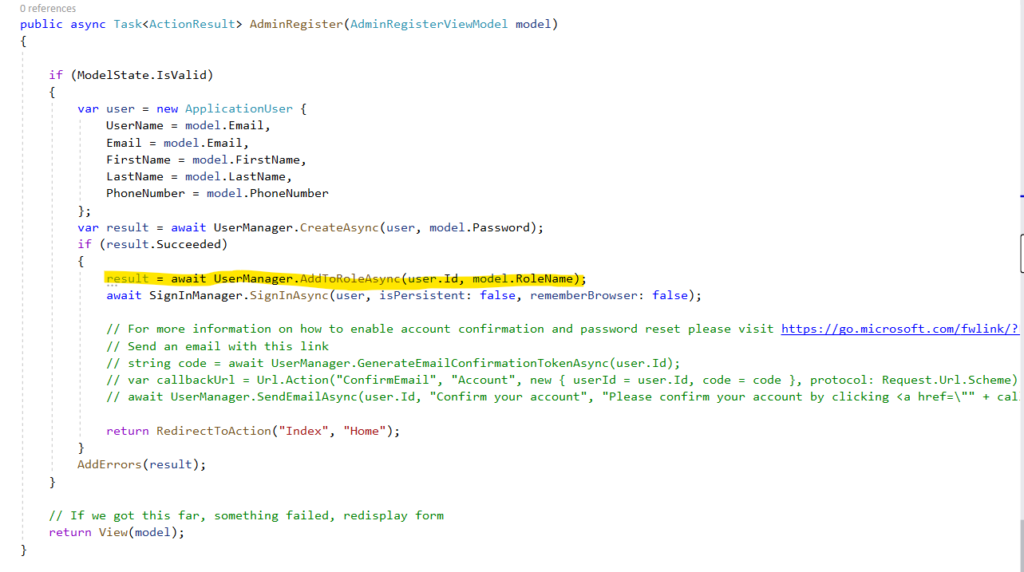
Next, still, on the Account Controller file, you can see that there is a built-in Register where .NET record your information when you register and make you a user in the system. All you need to do is adding in the yellow line above and your role will be determined.
Step 6: Restrict and allow the access depends on the roles
Cool so far? But now what if I am just a normal user but somehow I manage to register myself as an admin. How can we set up so that only an admin can assign roles to people? The answer lies in a simple word Authorize

Here you can see that, I authorize only the admin can assign roles for people by creating a new view called Admin Register and only the admin can access that view. The [Authorize()] function here does exactly just that.
But now we have a new problem, for a hospital system, how can the admin assign thousand of people registered on the website every day? It is reasonable for him to assign roles for a few editors and admins once or twice a month where there is new recruit but a thousand of the registered user will probably put him in hospital (at least, he can save himself the rush of going to the hospital because he is already in the hospital). So to ease his work, I modified my code a little bit as below:
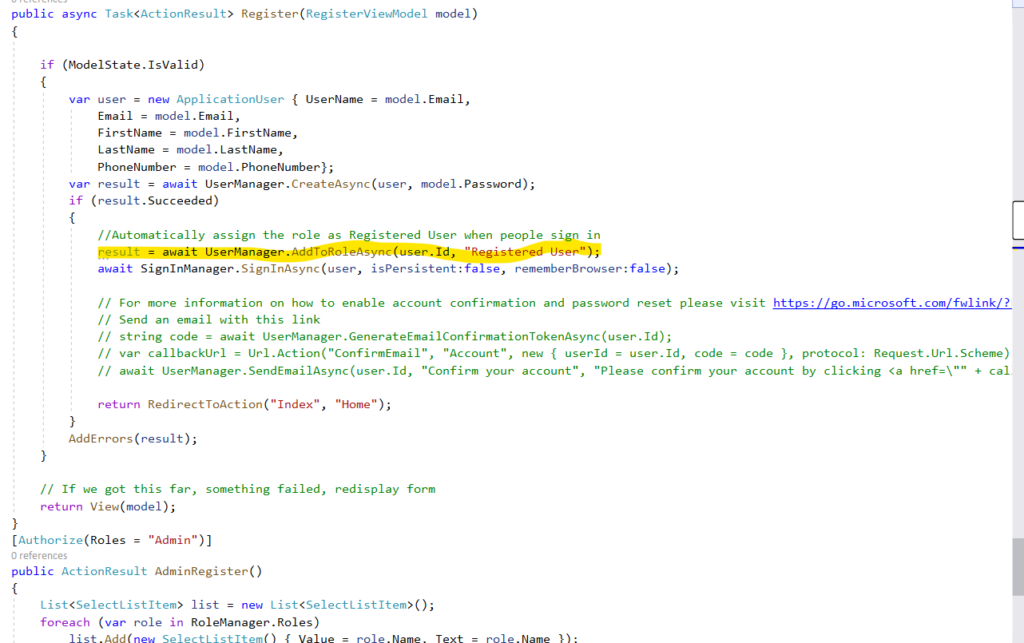
Apart from the AdminRegister function, in the Register function that is provided by .NET, I add in the yellow line. So now whenever a normal user registered he will automatically be assigned the role on the website. That will save a lot of time for the administrator team. You are welcome!
Step 7: Bonus round on sAuthenticated and IsInRole
Let’s say you have a get well soon card feature on the hospital website. If you are the admin, when logging in, you will want to see the whole list of card in the hospital. However, if you are the normal visitor, why would you care about the get well soon card of other people. That is also a major breach in security. This is how we can accomodate that:

Here if Request.IsAuthenticate will check if a user is logged in or not. The user has to log in to use the feature in the site, if not they will be redirected to a welcome page. Then User.IsInRole will check the role of the user to redirect them to the right page.
Here another question arises. The admin and editor will be redirected to the big list regardless of their ids but how can we catch the user id when logging in to redirect him to his personal page.
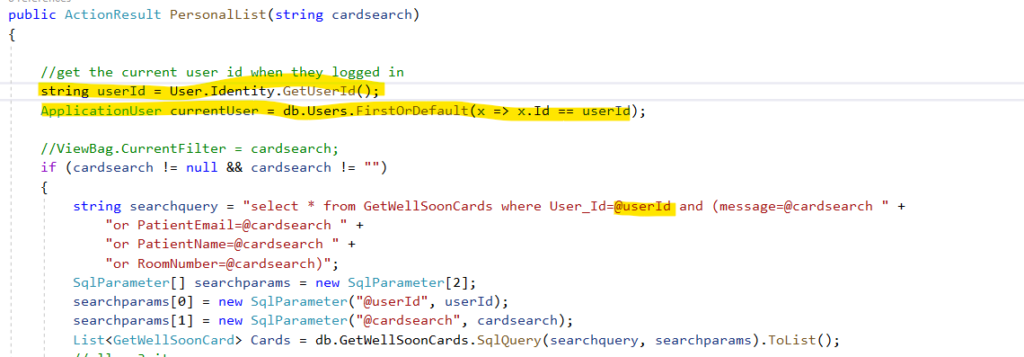
The first two lines above will get you the user id of the person who is currently logging in the system then you can use it in the query as specified.
Conclusion
Have you noticed that I only post part of my codes in this long post (yes, I know it is long, so if you can read this line, I cannot thank you enough, so please message me just to say to me “You are welcome!”)? As I said, I love reverse engineering and I would hope you feel the same. It would be a sin if I deprive you of all the fun you could have while figuring out the code. So here is my GitHub for hospital project where I implement the login system: https://github.com/vietphuongtran/TemiskamingHospital. You can also find other interesting stuff that my teammates did in this project as well. So have fun and see you in the next blog!!
What an informative blog
Thank Ella, do you want me to write on how to deploy a .NET one!!
Sure thing!