“If a tree falls in a forest, does it make any noise?”. “If your application is in your localhost, what are you talking about?”. An important skill for any developers is to deploy the project, to put it out there for people to see. So today, as a person who struggles a lot with it, I am going to show you how to deploy a MERN stack application using Heroku.

Step 1: File structure
In order to deploy to Heroku your file structure should looks like this:

However, as we are co-operating in a team we often decide to have a different structure of the file. For example, my team kept all our models, routes and server.js in a backend folder and all the public, src outside. Whatever the case, first thing first we have to move and that could be tricky.
One thing you need to remember when moving wherever your file moves, the package.json and package-lock.json at that same level moves with the file. For example, when you move server.js you must move the package.json with it to the new folder. The same goes for the package.json of the src folder.
You don’t have to move the node-modules folder but remember to run npm install in the client folder and the root folder to install any missing packages.
Step 2: Modifying the server.js
The server.js file is the brain of your application and in order to deploy, you have to make some changes.
First of all, make sure you define the port with that line:

Secondly, check your mongodb to see if it is connected with an online cluster.

Next, add these line before the app.listen

What that does is that it tells Heroku to go inside the build folder inside the client folder and search for the index.html and show it in the browser. But the question is where is the build folder? That brings us to the next step: npm run build.
Step 3: Npm run build
Before doing this step, make sure that you double-check everything in your component. One of the things to look for is all the localhost:4000 in your API call get deleted. The reason for that is because when you deployed, the localhost will not exist anymore. Leaving that line on you can still deploy but it will not show any data on the screen. You would not want that happen when a potential employer visits your site, would you?
Once you ‘ve done that, open the terminal in your IDE cd into the client folder and type npm run build. Now, wait for a few minutes and the build folder should appear inside the client folder. The build folder minified all the JavaScript so that the browser can understand and project it on the screen.
Step 4: Modifying the package.json
We are almost there. Now inside the package.json at the same level as the server.js, you need to add in these lines:

Remember when you start the react application, you always have to start the server with node server.js. The first line does exactly the same but on Heroku. The second line tell Heroku to go inside the client folder install any missing packages and run build everytime we make changes.
Final step: Push to GitHub and connect to Heroku
Now push everything to Github. Then go into Heroku, create a new application. In the deploy tab in your new application, connect your GitHub with Heroku

Almost the end, everyone. Still, on the deploy page, scroll down and press Enable automatic deploy. This will allow you to automatically update your page every time you make changes to GitHub.
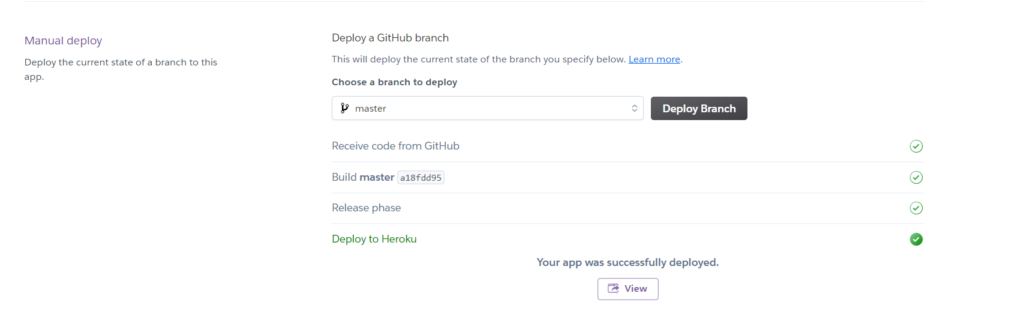
Then at the bottom of the page, you can see the Deploy button and this is it!!

Hit the Deploy Button and finger-crossed! (Seriously, finger-crossed, guys). A dialogue will appear showing you the progress of the build and if everything go as planned, your project should be live in a few minutes.
Bonus: Result

If you want to play with our newly-deployed application, please visit https://appli-demoapp.herokuapp.com. It is a demo of a new generation job board that allows users to track their job applications and expand their connections through networking events and online forums.
Wonderful guide! Great job, Paul!