testing 4
Blog
1234
42345234234
How to deploy a MERN stack application using HEROKU
“If a tree falls in a forest, does it make any noise?”. “If your application is in your localhost, what are you talking about?”. An important skill for any developers is to deploy the project, to put it out there for people to see. So today, as a person who struggles a lot with it, I am going to show you how to deploy a MERN stack application using Heroku.

Step 1: File structure
In order to deploy to Heroku your file structure should looks like this:

However, as we are co-operating in a team we often decide to have a different structure of the file. For example, my team kept all our models, routes and server.js in a backend folder and all the public, src outside. Whatever the case, first thing first we have to move and that could be tricky.
One thing you need to remember when moving wherever your file moves, the package.json and package-lock.json at that same level moves with the file. For example, when you move server.js you must move the package.json with it to the new folder. The same goes for the package.json of the src folder.
You don’t have to move the node-modules folder but remember to run npm install in the client folder and the root folder to install any missing packages.
Step 2: Modifying the server.js
The server.js file is the brain of your application and in order to deploy, you have to make some changes.
First of all, make sure you define the port with that line:

Secondly, check your mongodb to see if it is connected with an online cluster.

Next, add these line before the app.listen

What that does is that it tells Heroku to go inside the build folder inside the client folder and search for the index.html and show it in the browser. But the question is where is the build folder? That brings us to the next step: npm run build.
Step 3: Npm run build
Before doing this step, make sure that you double-check everything in your component. One of the things to look for is all the localhost:4000 in your API call get deleted. The reason for that is because when you deployed, the localhost will not exist anymore. Leaving that line on you can still deploy but it will not show any data on the screen. You would not want that happen when a potential employer visits your site, would you?
Once you ‘ve done that, open the terminal in your IDE cd into the client folder and type npm run build. Now, wait for a few minutes and the build folder should appear inside the client folder. The build folder minified all the JavaScript so that the browser can understand and project it on the screen.
Step 4: Modifying the package.json
We are almost there. Now inside the package.json at the same level as the server.js, you need to add in these lines:

Remember when you start the react application, you always have to start the server with node server.js. The first line does exactly the same but on Heroku. The second line tell Heroku to go inside the client folder install any missing packages and run build everytime we make changes.
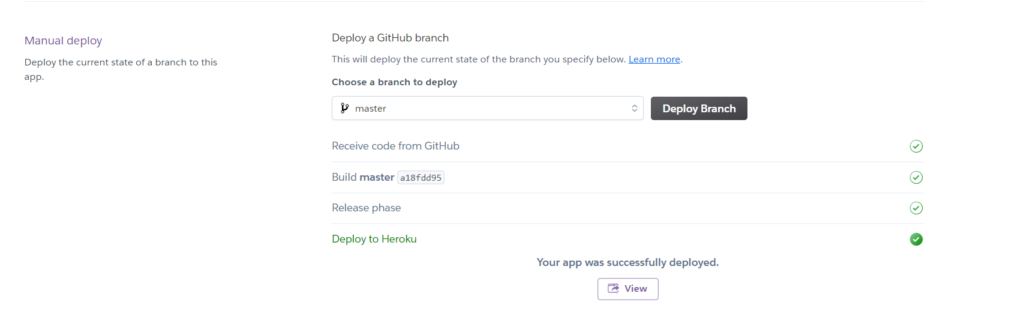
Final step: Push to GitHub and connect to Heroku
Now push everything to Github. Then go into Heroku, create a new application. In the deploy tab in your new application, connect your GitHub with Heroku

Almost the end, everyone. Still, on the deploy page, scroll down and press Enable automatic deploy. This will allow you to automatically update your page every time you make changes to GitHub.
Then at the bottom of the page, you can see the Deploy button and this is it!!

Hit the Deploy Button and finger-crossed! (Seriously, finger-crossed, guys). A dialogue will appear showing you the progress of the build and if everything go as planned, your project should be live in a few minutes.
Bonus: Result

If you want to play with our newly-deployed application, please visit https://appli-demoapp.herokuapp.com. It is a demo of a new generation job board that allows users to track their job applications and expand their connections through networking events and online forums.
How to install a login system in ASP.Net
ASP.Net is truly a wonderland, full of magic for you to explore. Its built-in frameworks offer convenience that can make you feel like a wizard wielding the wand to create an application. One of the magic that you have to try is the login system.
Why a login system
Almost all of the dynamic, data-driven applications and websites today require you to create an account, log in to use the unique service they offer. And it is not without a good cause. Logging in to a site creates your own personal space within that site. And from that, we, developers can tailor the unique experience just for you in that space.
For example, in the hospital project, I am working on, if you log in you can get access to all kind of services in the hospital like sending a get well soon card, registering a parking spot, booking an online appointment or even putting your name in the hospital’s events etc…
With that being said, without further adue, here is how it is implemented…
Step 1: Say the spell
For all magic to happen, you have to say the right spell (don’t say Avada Kedvra please). For .Net, the login system I built is based on Entity Framework 6 (EF6) using together with the Model View Controller (MVC5), .Net Framework. Remembering these keywords also helps you a lot in researching whenever you come into bugs (trust me, you will).
To start this, when creating a new project, in the Create a new ASP.NET application, click on MVC click Change under No Authentication and choose Individual User Account.
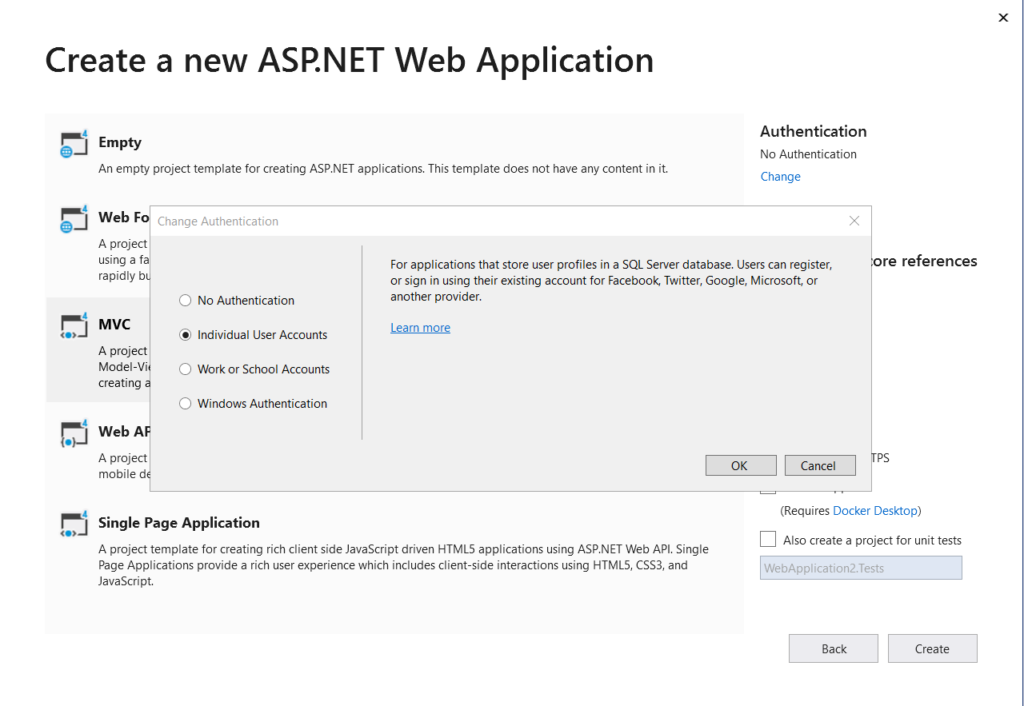
And voila. Now you can see all the built in function that ASP.NET layout for you in order to build a great app.
Step 2: Reverse Engineering
When you finish Step 1, you probably notice that .Net framework has created a basic code base for us. You can find a whole bunch of files under all three folders: Controllers, Model and View.
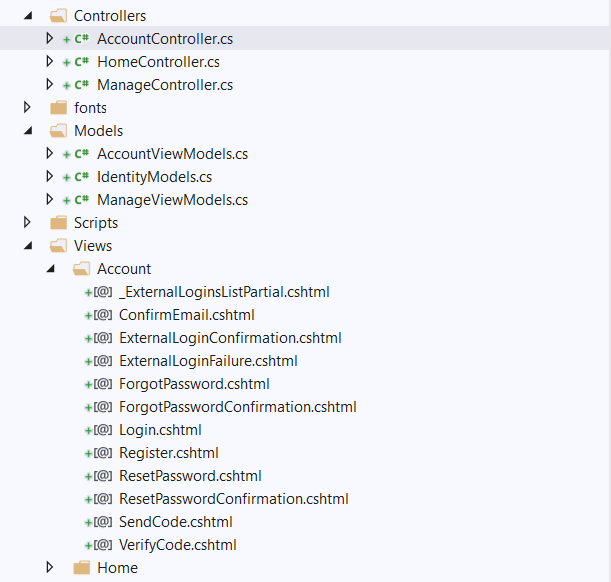
And this is the part I like most: Reverse Engineering. Others may argue but I feel like I understand better when someone throws at me a tonne of codes and ask me how it is used rather than learning line by line. By a little bit of reverse engineering, with that code-base, you can see that .NET have already laid out the most basic stuff for you. Users can now register then log in with the registration information they provide. Just take a look at that, do some experiments with it. You don’t need to understand it right away but trust me, later on, you will have the “aha” moment.
Step 3: Analyzing the problem
As mentioned above, my login system will divide the access right for different users in the site. There are two ways to do that, one depends on who you are, the other depends on what is your role in the website. For example, for a hospital website, you can divide the user into patients and families, donors, applicants, doctors, nurses, editors and admin etc… Each group will have its unique content and restricted area. A patient cannot access the doctor’s file and another patient’s information for instance.
The other method is what is your role. In this method, what you do with the website is more important than who you are. Based on that, patients and families, applicants and donors can be categorized into the same group as they are after all website users. Editors will be grouped together and an admin who is a super-user can be in a group of his own.
As you can see, the role-based system is actually simpler and that’s why I prefer it over the other but depends on the context of your website, you can use whatever method that suits you.
Step 4: Slicing down the problem
If you watch my blog, you will see that I have the habit to divide a big problem into many smaller ones. And for this one, this is the step I have laid out:
- Create the basic register, login form: .Net has already done that for us
- Choose between role-based or person-based system: done that already
- Identify how many and create roles your website should have: normally I usually divide into 3 roles: registered user, editors and admins. You can have more depends on the complexity of your website
- Restrict and allow access based on the role that people have on the web site: An admin should have access to create, read, delete and update every entry. An editor can create, update, read but he should ask permission from the admin to delete. A registered user only has the right over his/her own content.
Slicing down the problem like that also helps you a lot in research and later on in the debugging process. If you have not known that, revisit my Programmer’s Cat theory.
Step 5: Registering the role
Now is the time you put the knowledge you gain from the Reverse Engineering above into good use. If you study the boiler-plates that .Net set up nicely for us, you can see that the login system is actually Model-View-Control at its core. That is why it has Account Controllers, Account View Model and Account View. So what if we could do the same with the Roles? The admin can create, assign people to roles, add more roles and delete the roles as he needed. So basically it is the MVC system. So because of that similarity,
And now the code:
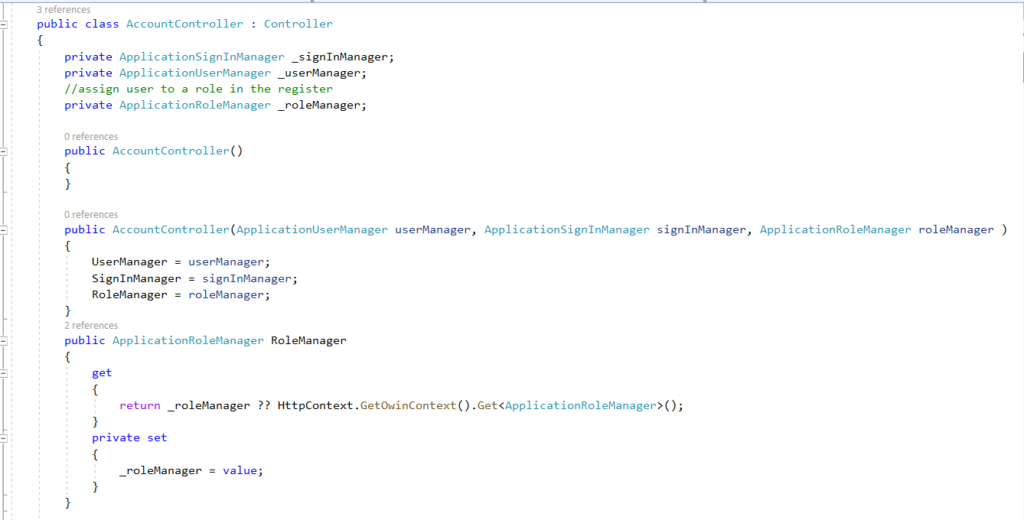
Adding the RoleManger in the Account Controller’s part. Here the Signin Manager and user Manager is already built-in. Sign in Manager will register your sign in information to create your profile. User Manager will check that information whenever to determine whether you are truly who you claim to be. Base on that, I introduced another player in the game. The role Manager, so that .Net will know what role you have on the website in order to proceed further.
Next, still, on the Account Controller file, you can see that there is a built-in Register where .NET record your information when you register and make you a user in the system. All you need to do is adding in the yellow line above and your role will be determined.
Step 6: Restrict and allow the access depends on the roles
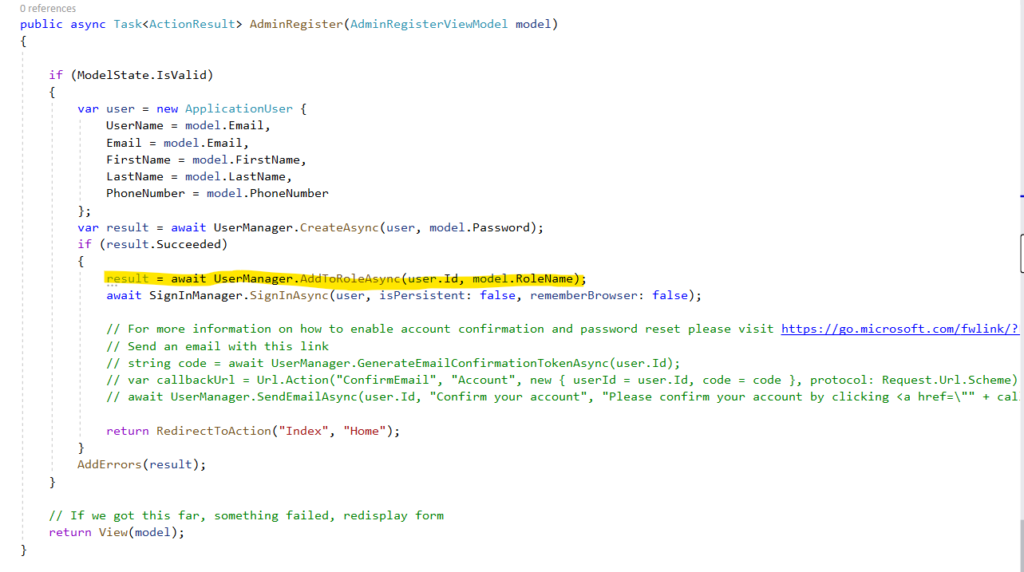
Cool so far? But now what if I am just a normal user but somehow I manage to register myself as an admin. How can we set up so that only an admin can assign roles to people? The answer lies in a simple word Authorize

Here you can see that, I authorize only the admin can assign roles for people by creating a new view called Admin Register and only the admin can access that view. The [Authorize()] function here does exactly just that.
But now we have a new problem, for a hospital system, how can the admin assign thousand of people registered on the website every day? It is reasonable for him to assign roles for a few editors and admins once or twice a month where there is new recruit but a thousand of the registered user will probably put him in hospital (at least, he can save himself the rush of going to the hospital because he is already in the hospital). So to ease his work, I modified my code a little bit as below:
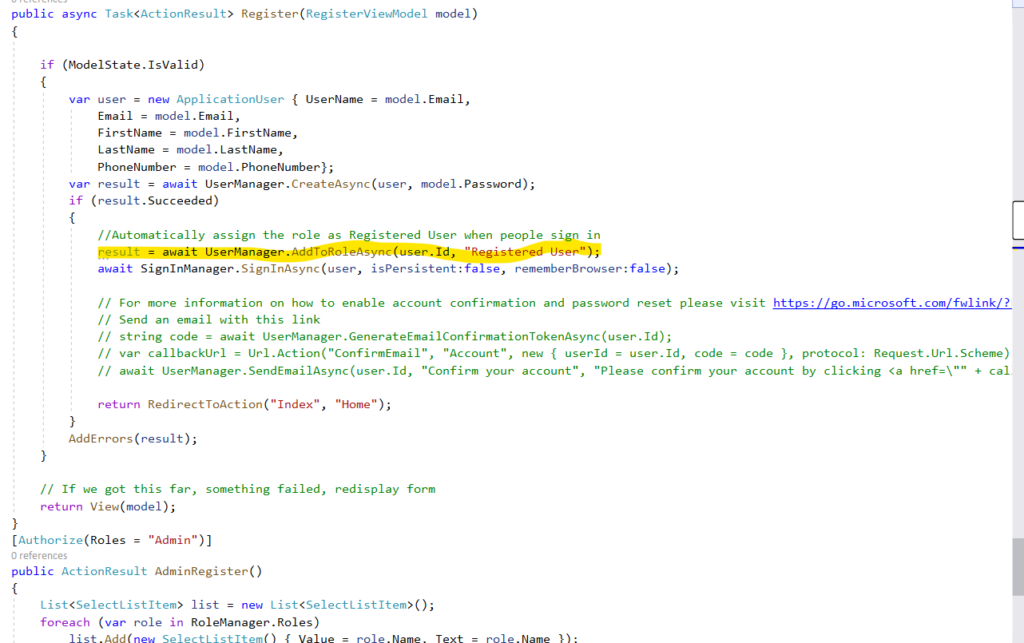
Apart from the AdminRegister function, in the Register function that is provided by .NET, I add in the yellow line. So now whenever a normal user registered he will automatically be assigned the role on the website. That will save a lot of time for the administrator team. You are welcome!
Step 7: Bonus round on sAuthenticated and IsInRole
Let’s say you have a get well soon card feature on the hospital website. If you are the admin, when logging in, you will want to see the whole list of card in the hospital. However, if you are the normal visitor, why would you care about the get well soon card of other people. That is also a major breach in security. This is how we can accomodate that:

Here if Request.IsAuthenticate will check if a user is logged in or not. The user has to log in to use the feature in the site, if not they will be redirected to a welcome page. Then User.IsInRole will check the role of the user to redirect them to the right page.
Here another question arises. The admin and editor will be redirected to the big list regardless of their ids but how can we catch the user id when logging in to redirect him to his personal page.
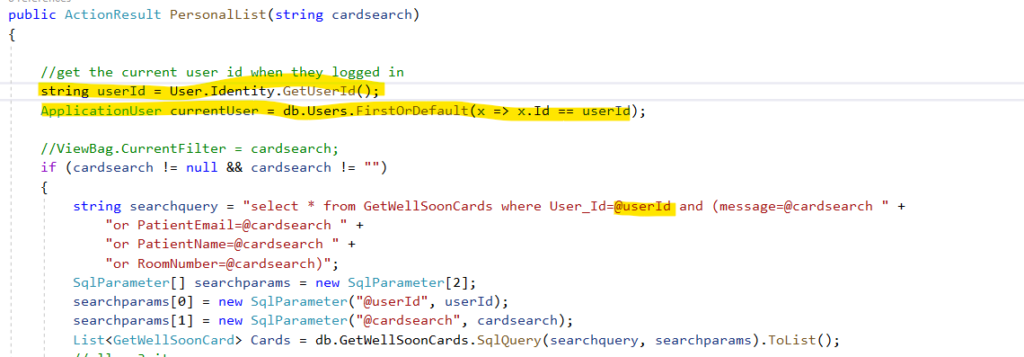
The first two lines above will get you the user id of the person who is currently logging in the system then you can use it in the query as specified.
Conclusion
Have you noticed that I only post part of my codes in this long post (yes, I know it is long, so if you can read this line, I cannot thank you enough, so please message me just to say to me “You are welcome!”)? As I said, I love reverse engineering and I would hope you feel the same. It would be a sin if I deprive you of all the fun you could have while figuring out the code. So here is my GitHub for hospital project where I implement the login system: https://github.com/vietphuongtran/TemiskamingHospital. You can also find other interesting stuff that my teammates did in this project as well. So have fun and see you in the next blog!!
My proposal to .NET
After a long time of seeing and dating each other. I have decided to marry this interesting, wonderful and out-of-this-world girl. Her name is .NET. And I have prepared for her a fascinating wedding gift, Comic Corner – a comic store website built using the Model-View-Controller (MVC) model. Would she say Yes?
Passion Project
My teacher named this one the passion project and this, for me, truly does make my passion, my childhood dream comes true. As a child, I was so in love with comics. I used to hide my mom to read comics all the time. When I got caught, I would have to say goodbye to pocket money for a month, which most of them were spent on comics. At that time, I had a small dream of opening a comic store, so I could read comics all day long while making money out of it. Over 20 years passed by, with many hardworking and relentless efforts, I still can not open a comic store, but now, at least I could build a website for my imaginary store.
Wireframes
It starts to get into a habit of mine whenever I have a new project to go straight into my desk not to code but to grab my pencil and draw out the Entity Relationship Diagram and Wireframes. That’s the first checkpoint to get back whenever I get stuck.

My entity-relationship diagram

My list view page

My view page
I hope that you like my wireframes because the actual project looks … nothing like it.
Debugging
You would not expect the bug to appear that soon, neither would I. But it is quite often that the more excited you are with your project, the more likely that the bug will come earlier than expected. If you passed the first hurdle that early, the rest of the project would go smoothly.
My first bug hid well in plain sight with the App_Data folder. I was told that you need to create the App_Data folder because that’s where the local database is stored. However, when I created the project, I have already seen the App_Data folder in the Solution Explorer so I thought this was alright, and of course, as usual, I was wrong. In the actual directory, there is no App_Data folder, so you have to add it manually. This took me an afternoon to figure out after running the Code First migration command again and again without getting any result. Well done, bug.
The second bug is the classic 404 Server Error in “/” Application.

This had me scratched my head for a while until I found out that the solution lies in just 3 simple lines of code:

It turns out in the MVC model whenever you want to display a web page you need to have that simple 3 lines. It will tell the MVC to look for a page name Add in the folder with the same name as the Controller (in this case: Comic) and then display that web page.
And then and then and then the bugs would keep coming in so much that to the point that I was so happy to see a new bug. Because new bug means new progress and one step closer to finishing the project.
Changing the plan
In the wireframes, when adding a new comic, the initial plan was to create a checkbox so that user can choose multiple categories that the comic belongs to.

But that process soon revealed a problem. In my ERD, comics and categories are many to many relationships, a comic belongs to many categories and a category can have many comics so there would be a bridging table between them. Therefore, without knowing how many categories the user choose for a comic, I would no way know how many queries would I write to insert into the bridging table. Moreover, since it is a new comic, it does not have an Id yet so how can I insert that Id into the bridging table?
This situation required me to change the plan, so instead of adding the category for a comic at the beginning, the user can only add the category one by one once the comic is created. By that way, both problems are solved, the comic ID is known and adding category one by one meaning the controller does not have to guess how many queries to write and only write one query at a time.
What else could I do?
Achieving a small goal always make me wonder: “Ok, cool, what the next step?”. So by the time I got my comic and category done, I thought I could introduce customer reviews into the picture.
Ok, so what’s next? How about introducing customer reviews to the game?
The reviews should be on the Show comic page. And when you click on it, it will direct you to the customer page with his detail information and recent activity, which is the reviews he has just made.
In the future, when I have more tables in my database, I could project more information into the customer page such as “Recent purchase”, “Suggested shopping list” etc… It was such a pity that I have to leave this project so soon but I will develop it further both in the back-end and front-end in the future.
So, .NET, what do you say? I know I would have to improve a lot in my front-end and I promise I would do that for you with Bootstrap, SASS and even plain CSS in the future. Will that be enough of a proposal to you?
Never say no to new opportunity: My story of Global Game Jam 2020
“Hey do you want to join the game jam this weekend with us?” My friends asked. “But I know nothing about game programming.” “Me neither. But that is why I join, to learn new things.” And just like that I was convinced to join the Global Game Jam 2020 and it was the most memorable experience we have ever had.
The short-lived excitement
All great ideas start with doodling of the pencil on paper and that was exactly what we do when we receive this year’s theme: Repair. Many ideas were discussed and finally we decided to do a side-scrolling shooting 2D game. The scene was set into a post-apocalyptic war and players shot collapsed bridges and gates to repair it. He also has to face with mutant birds and monsters along the way. Sounds exciting but also challenging for 5 web developers who had no experience in game programming.
Then we explore Unity, which we would use to program our game. The good news was the programming language behind that was mostly our good friend C#, which we use so much in our web programming. Therefore, we were confident that we could adapt to it in no time. Or at least that’s what we thought.

Overwhelming and regrouping
The excitement from the first day did not last long. We were soon bombarded with a ton of problems that we had no idea which one to solve first. And when we googled the solution, we were overwhelmed again with a page-full of code that we again had no idea what it was about.
Take a deep breath. Close my eye. Suddenly, I remembered my technique of debugging: the Programmer’s cat. Every big challenge is made up of small problems that we could solve one by one easily. Following that rule, I divided up my task into a smaller chunk and conquered them one at a time.
My task was to create an enemy for the game. To do that, first I needed to make it animated, then make it move left and right patrolling a specific path and finally the enemy would be able to shot at the player trying to kill him. It was still a difficult task but it was certainly less than the beginning now that I knew which step I should take.
My enemy AI
An infinite loop of problem
Things were much clearer but because we were trying to learn what people have learnt for 2 years in just 2 days, it was still a long way to go. We were caught in an infinite loop: learning, encountering problems, learning to solve the problems, encountering new problems, learning to solve the new problems. After spending 3.5 hours, I can finally make my mutant bird flapped his wings. My celebration was cut short when I found out he can not move. Then another 2.5 hours were spent to figure the way to make him move by some CSS Transform technique. Once again, after that, I had no time to patch myself in the back, because he could not turn around so he would fly and fly until he hit the wall. This took me another 2 hours to solve and when I was done, so did the night. However, for the first time, I had a slender hope that we could finish this on time. Or at least that was I thought.
My mutant bird can flap his wings but can not move
He could move now until he …hit the wall
Finally he could move and turn smoothly after a night of practicing.
Merge error: A final comfortable headache
Just when we thought that the hardship is over. When we combined our part on Github, we face the ultimate challenge: Merge error. We had to check every file and every single line of code to track the change. It was a tedious task but we were all happy knowing that we were so close to the end and looking back on all the problems we have overcome, this one was more like a comfortable headache. With that attitude, we finally manage to finish and submit on time. Here is the game that we built, please enjoy. For a complete game, visit our site at https://globalgamejam.org/2020/games/environment-defender-0
Through this post, I want to thank all of my teammates who have trusted and invited me to this incredible occasion and who share the same passion and eagerness to learn like me. Thank you all!
The Programmer’s cat: My technique of debugging
Nobody likes bugs and programmers especially hate bugs. Therefore, one of the first lessons I study when I started programming is how to debug the code. I name the technique “The programmer’s cat”. And to understand it, you first need to do the steps follow.
Step 1: Slice down your problem
Ever feel overwhelmed when you receive a huge project with over 20 websites, all database driven with a dozen of database tables to take care of. Don’t be, take a deep breath and divided your big projects into a smaller chunk of tasks and suddenly it feels easier, right? Then, you will conquer them one by one. Your head is easy to fool when you finish a small task, keep telling yourself “We are almost there” and eventually you will be there in no time. By that way, you are also facing less stress and thus, writing clearer codes and fewer bugs

Cheat your mind by keep feeding it with small tasks until the big projects get done
Image source: https://clickleo.com/problem-solving-using-copy/
Step 2: 1 minute coding, 3 minutes testing
Take one baby step at a time, testing every line of code you write thoroughly. Do not wait till the end then do the testing because you will be lost in a maze just to find a missing tiny tiny semicolon. Check your direction frequently and thoroughly so you can get ahead. And one more thing, don’t forget to leave a little bread-crumb trail along the way with comments between a numerous line of codes so you can always find the way out when you are getting lost.

Don’t wander around the jungle just to find a tiny semi-colon
Image source: https://www.pinterest.com/pin/559783428655367005/?lp=true
Step 3: The programer’s cat
All these steps lead us to the technique I call “The Programer’s cat”.
Unlike the famous physicist Schrodinger, who was unsure whether his cat is alive or not, we the programmer can confirm our cat (in this our cat is our code) is working or not at a specific given time. Then we can turn back the time to undo the bug which killed our cat. Feel like a superhero, huh? For example, if you sliced down the problem to part 1, part 2, part 3 and do careful and thorough testings for each part then when a bug comes, you can be sure that the broken pieces must come from part 4. That will narrow down the search, making the process a lot faster. To compare now you don’t have to find a semicolon in the middle of the jungle anymore, you just need to find a broken branch in a specific tree and chop it off.

Hope this cat is not missing a semicolon in his code
Image source: http://nlfunnyvideos.com/fun/programmer-cat-ignoring-mouse-funny/
I hope the technique above will help you guy a lot as it helps me in finding the bugs. Stay tuned for more sharing from me the next time.